My poor blog has been so sorely neglected, but I'm back for another LOAD (LayOut-A-Day) month and had several questions as to how I created my layout for Day 6. I started to leave a really long comment on Flickr, but then decided that it would work better if I could show a bit more, so it was a good excuse to get back to my blog! Here's my layout, so that you know where I'm heading:

First let me say, there are probably templates like this out on the internet somewhere. But honestly if you have even a little bit of knowledge on using Photoshop Elements (or Photoshop), it may be faster to create your own than to spend time searching! This is digi and pretty easy to create. I used Photoshop Elements 12 (PSE12), but this can definitely be done with earlier versions (unless you have a REALLY old one that doesn't use layers). And although I'm far from an expert, I was working in "Expert" mode (this might be unique to PSE12). I also turned on the grid and enlarged the view so I could see the top corner better.
1) I started with a 12x12 canvas. (File>New>Blank File, then chose 12"x12")
2) Using the rectangle tool, create one 2x2 square in the top left corner, then copy that square five more times. (Layer>Duplicate Layer>click OK - you can rename it here or later. There are shortcuts, too, but I want to keep this simple.)
3) Move the squares across the top of the canvas. And just to make sure they are lined up, selected all six and Align the Tops and Distribute using the Middle (horizontal centers).
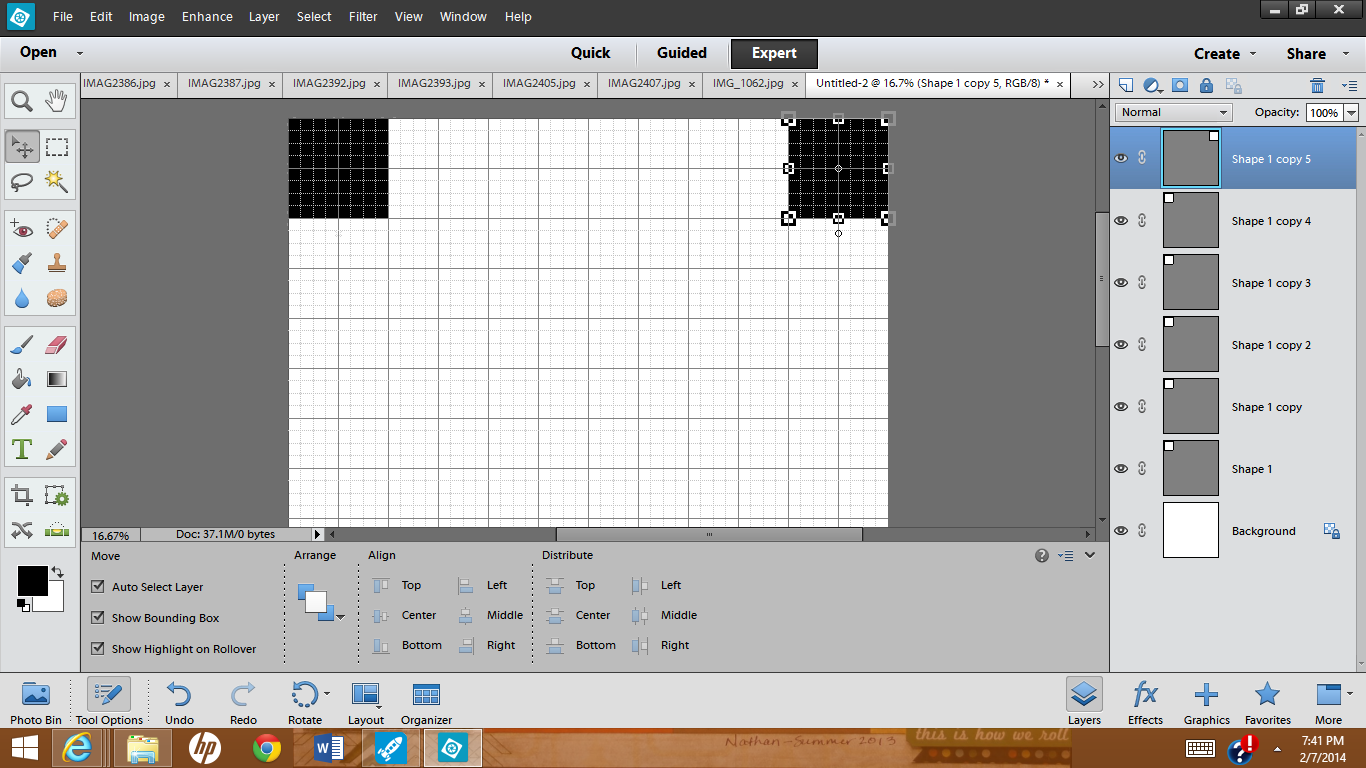
(at this point I renamed my layers just to make things easier for me).
4) Select all six layers and copy those, then move the whole group below the first row.
You now have two rows of 6 squares across.
At this point you may want to recolor alternating blocks with a different color - it's not really necessary, but it makes it easier to see exactly where you're adding the photos later on. (Make sure that blocks bordering each other are different colors, like a checkerboard.)
5) Next select all twelve blocks and copy those again and move that group below the second row. You should now have four rows for photos.
6) Go back to the third row and copy those six blocks (so the colors are in the right order) and move them below the 4th row.
(That last group of layers are probably in between rows 3 and 4 so you may want to move the layers to the top of the list - it's not critical, but easier to keep things straight. [The previous photo shows the layers already moved.])
7) And finally choose one block to put on the bottom row for the 31st photo.
8) Once you have the basic template done, SAVE IT (in case you want to use it for next month!)
Then go and open the photos you want to put on your layout. (At this point you can also turn off the grid [Ctrl-'] since you won't really need it anymore...I didn't think of it until later.)
9) To add your photos to the layout, start with the top block (the first layer above the background) and select that layer by clicking on the layer in the Layers Panel or by just clicking on the block in the layout.
Then open the Photo Bin and single-click on the first photo you want and drag it up to your layout. (And yes, I'm shamelessly showing off pictures of my adorable 3-month-old grandson!!)
Move it over the first square and resize it until it fits the way you want it to and click the green checkmark (or click the red circle thing if you want to start over with resizing it!). Finally you'll want to "Clip" this layer to the one below it - in PSE you can use Ctrl-G (Cmd-G on a Mac?). This isn't super important with the top row, but it will make a difference in lower rows if your picture isn't already square.
10) Repeat this process for all of the rest of the squares by clicking on a Layer (or block), selecting a photo from the Photo Bin, moving it onto the canvas, resizing the photo, and clipping it to the layer below.
(Here's where I finally thought to turn off my grid :P)
You can actually fill in the squares in any order. Just select the layer you want and then move the photo in - Photoshop will automatically put the photo in a layer just above the one you've selected
.
The last thing I did was select the background layer (all the way at the bottom of the list), chose the "bucket tool" and filled in the background with black.
I also wanted a thin border around the edge, so I switched back to the "move tool," selected ALL of the layers except the background (click on the first layer, then Shift-click on the last layer to select everything in between), and made the whole thing just slightly smaller and centered it on the canvas.
I added my title (using the Text tool) and it was done!
Writing the directions took way longer than creating the layout! It looks long, but it's really quite simple, particularly if you know anything about PSE. And once you've created one template, you can adapt these directions to any size photo or grid that you want. I wish I could just show you, but I couldn't figure out how to create a video :/
Try it out and let me know what you think. If you have any questions, leave me a comment below and I'll try to help. I'm not super experienced with Photoshop, but I have worked with templates a bit and I'd be happy to share what I know.


